Friday, 26 February 2021

You are Pawsome - Hedgehog Hollow February 2021 Subscription box

Hello Everyone, 

I'm at Hedgehog Hollow blog  with my another post using February Subscription box . For Today post, I have created these two fun 'You are Pawsome' cards using tone on tone stamping technique.

Card 1


I started with A2 size card base. And first I stamped the paw prints repetitively from 'Puppy Love' stamp set using Cracked Pistachio Distress Oxide. Then I ink blended this stamped panels with same Distress Oxide color.


Meanwhile, I stamped this Love paw print image from 'Puppy Love' stamp set using Color Hive reMARKable - Eclipse Black - Hexagonal Ink Pad and fussy cut it. I adhered this image on card panel using foam tape. Then, I die cut out 'You' using STAMPlorations You & me dies and ink blended it using Pistachio Distress Oxide. Finally added the fussy cut printed sentiment 'you're pawsome' along with some tiny white heart embellishments to complete this card.


Card 2


For this card, I took a die cut out stitched rectangular panel. And stamped it with paw prints using Worn Lipstick Distress Oxide as we did in our first card and ink blended it using same ink. Then, I adhered this panel on watermarked white card base.


After that, I stamped the Paw print from the 'Love You Fur-ever" stamp set using Color Hive reMARKable - Eclipse Black - Hexagonal Ink Pad and fussy cut it. Adhered it to card panel using foam tape.


Finally added the fussy cut printed sentiment 'you're pawsome' along with some tiny pink hearts to complete this card.


I hope you really enjoyed these projects. Thank you so much for joining me today .

Keep watching this place for more inspiration. Don’t forget that you can share your projects on The Hedgehog Hollow Box Facebook group as well as Stamping at the Hedgehog Hollow Facebook group. We would love to see what you are creating with this wonderful box.

Hugsxx
Deepti Aggarwal

Playing alongwith:

Wednesday, 24 February 2021

InkyStamper Stamps - You're just plane cool!!

Hello Everyone,

I'm stopping by to share this see through card which I've made for Inkystamper's Facebook Group challenge where the theme is Window Card. I've used  InkyStamper's stamp set called Paper Airplane

Over to my card..


To make this card, I took A2 size white card base and die cut out the front panel using clouds dies. Then I adhered Clear Card panel and adhered it to the back side of the die cut cloud using double sided tape. 


After that I added another die cut the cloud at the lower portion of the clear panel using double sided tape and further layered it with another clouds die cut out using foam tape. 


Meanwhile, I stamped the image from Paper Airplane stamp set on white card stock and Gingham Yellow patterned paper using Nuvo Black Hybrid Ink  and die cut it out. Then I colored only the mouse image with Alcohol markers. Then with paper piecing technique, I fussy cut the Airplane from stamped patterned paper and adhered it to the white die cut out plane.


Then, I stamped the sentiment and small plane using Nuvo Black Hybrid Ink . I also added die cut out tiny plane on patterned paper to add interest.

I really enjoyed making this fun see through Window card. I hope you like it. Thank you so much for stopping by!

Hugsxx
Deepti Aggarwal

Playing along with:

Crealies - Love card with matching envelope

Hello Everyone,

I'm stopping by to share this Love card with matching envelope. And I've stamped the inside of the card too, to make it more interesting :). 


To start with, I took A2 size (4.25 by 5.5 inches) white card stock and adhered the die cut out hearts on this panel. These hearts were the by-product of my 'Veel Geluk' card which you can find here. You can also die cut out these hearts using Crealies Clover inside or out dies and sticker making sheet.


Then, I made my own heart stencil using Crealies transparent sheet and Heart dies. I secured this stencil on the card base using washi tape and ink blended it using Distress inks. Once satisfied I die cut out the cutie Elephant on colored card stock and adhered it on the center of the heart along with stamped sentiment and added some white hearts.


After that I stamped the inside of the card and white envelope at one corner using Bits & pieces Elephant stamp. Isn't this elephant cute?


I further glued an ink blended heart on these cute stamped elephants along with stamped sentiment.

I really enjoyed make this cute card. I hope you get inspired.

Thank you so much for stopping by!! 

Hugsxx


Monday, 22 February 2021

Kinda Cute by Patricia - Be Joyful

Hello Everyone,

I'm stopping by to share my DT Post for Kinda Cute by Patricia. For this card,  I have used Digi of the day  called 'Building Reindeer' for the month of February if you have already bought the February bundle then you might have received it in your email if not then you can find it here..

For the sentiment I've used Christmas Sentiment Set

Over to my card..


To make this card, I took A2 size white card stock and ink blended it using shades of Blue Distress Inks. Once satisfied, I splattered this ink blended panel with water to add interest. After that, I die cut this Birch Tree dies and adhered the same.


Meanwhile I  printed this cute digi along with the sentiment) & partially fussy cut it. I colored the image with Alcohol Markers and adhered it on the card base using foam tape. 


Finally I added some snow using white gel pen to complete this card. I hope you like it.

Thank you so much for stopping by!!

Hugsxx

Deepti Aggarwal

Playing along with:

Saturday, 20 February 2021

InkyStamper Stamps - Thanks a Bunch!!

Hello Everyone,

I'm stopping by to share this Interactive Thank You card using  InkyStamper's stamp set called Monkey from their latest release. These days I'm really enjoying making simple Interactive cards :) and I'm happy that I'm using patterned paper too.

Over to my card..


To make this card, I took A2 size white card base and layered it with blue gingham 6 by 6 double sided paper pad from Doodlebug Designs which you can find here in InkyStamper's Store. Then I die cut the the stitched rectangle on white card stock and adhered the same on card base.


After that, I die cut out the green patterned paper from same paper pad using Clouds dies (which I used here to depict tree) and grass dies.


Meanwhile, I stamped the images from Monkey stamp set on Water color paper using Nuvo Black Hybrid Ink , colored these using water color brush pens and die cut it out.


For the interactive part which was so easy and I think this is the easiest Interactive card I've ever made...I took white thread which I glued at the back of the colored monkey image and layered it with coordinating Monkey die cut out. Then I secured the thread at the top of the white card panel on a foam tape. Covered the top portion of the card base with green die cut out. 

A small video to show the interactive part.


After that I added die cut out grass along with tiny punched out  flowers. Then, I stamped the sentiment on white paper strip and glued it along with some punched out butterflies. Added the white gemstone for the final touch up.


I really enjoyed making this fun card. I hope you like it. Thank you so much for stopping by!

Hugsxx
Deepti Aggarwal

Playing along with:


Wednesday, 17 February 2021

InkyStamper Stamps - Buzzing by to say HI!!

Hello Everyone,

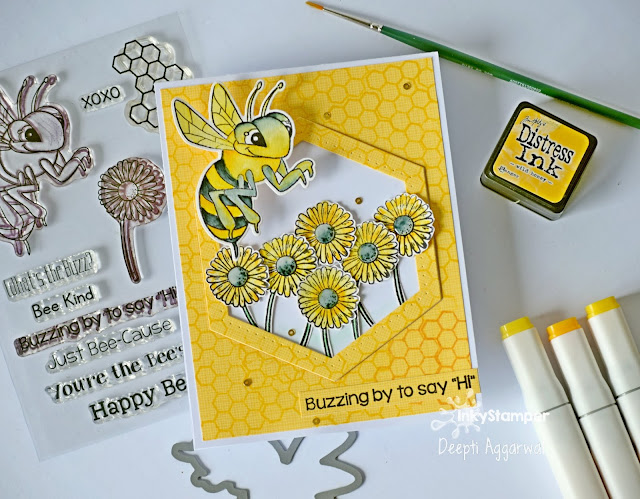
I'm buzzing by to share this cute Bee Wobble Card using  InkyStamper's stamp called Bee from their latest release. And for the change I've used  Patterned Paper  on my card...Yay!!! This is Gingham 6 by 6 double sided paper pad from Doodlebug Designs which you can find here in InkyStamper's Store

I love pattern paper so much that it's so difficult for me to cut it in to pieces.. Sounds Crazy??? right.... This is how I am .. a hoarder of patterned paper pads but don't use it often.. lol.. Are you like me ???

Lets move to my card... ;)


To make this card, I took A2 size white card base and die cut the pattern paper using Winnie & Walter Hexagon dies and stamped it using beehive stamp from the Bee Stamp set using Mustard Seed and Wild Honey Distress Inks.


After that, I adhered the pattern paper on white card base and added the hexagon die cut out layer using foam tape to add some dimension.


Meanwhile, I stamped the bee and flower images on Water color paper using Nuvo Black Hybrid Ink , colored these using water color brush pens and die cut out the bee & fussy cut out the flowers. 


I arranged all the flowers using foam tape. Then I added the water colored bee on wobble  and adhered it to the card base.

A small video to show the buzzing of this cute Bee :)


Finally, I stamped the sentiment on pattered paper strip and glued it to the card base along with some gold sequins.


I really enjoyed making this fun wobbling card. I hope you like it. Thank you so much for stopping by!

Hugsxx
Deepti Aggarwal

Playing along with:


Tuesday, 16 February 2021

Mission Control- We have a Birthday!

Hello Everyone,

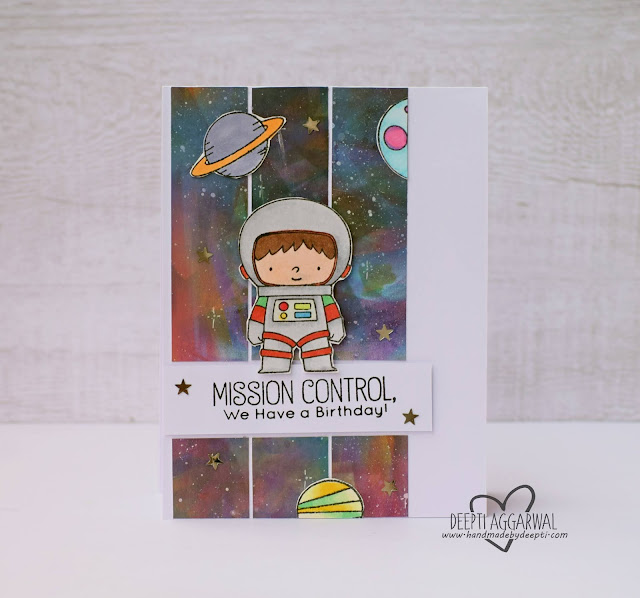
I'm stopping by to share this quick post where I've used MFT BB Space Explorer stamp set. This card  is inspired by their current Sketch challenge. 

Over to my card..

Galaxy theme birthday card  MFT stamps

To make this card, I took A2 size white card base and cut out galaxy background as per the sketch and adhered the same using glue. Check my  this post  to see how I made the galaxy background for my card.. 


Meanwhile, I stamped my images, colored theses using Alcohol Markers and fussy cut it. I adhered all the images with foam tape.


After that I added the stamped sentiment on white paper strip using foam tape. Completed this card by adding some Silver Star embellishment.

I hope you like it. Thank you for stopping by!!

Hugsxx
Deepti Aggarwal

Playing along with:

Wednesday Sketch Challenge - Sketch 528


Monday, 15 February 2021

Crealies - Veel Geluk (Good Luck ) Card - Video Tutorial

Hello Everyone,

I'm stopping by to share this "Veel Geluk" card using Crealies new Slimline dies & Clover dies. I did lots of ink blending to make it. 


To start with, I die cut out white card stock using Crealies Slimline dies. Then I die cut out lots of clover leaves on sticker making sheet and adhered it on slimline die cut out panel. Once satisfied, I ink blended whole panel using green shades of Distress Oxide & Inks.


I have a step by step video tutorial  for this card... Hop over to my YouTube channel to watch
it....If you like what I create.. then Please help me grow my channel by subscribing .. :)


For the sentiment, I've used Wordzz with shadow dies and die cut out the sentiment on black card stock and layered it on white die cut out shadow. Further added die cut out embossed white clover leaves along with their white negative hearts to complete this card.


Here is the close up of the card


I hope you get inspired.

Thank you so much for stopping by!! 

Hugsxx
Deepti Aggarwal

I have used following Crealies products:

Crealies Dies / Stansen:
     
    
Stamping cardstock, white 240 grams (20x A4)


Playing along with:
SSS Wednesday Challenge _ Make A Slimline Card